Handgun presentation is a critical and often over-looked skill. But the consistency with which we grip, remove from the holster, press out, and present the handgun for combat shooting is essential to our success. And, as we extrapolate this concept into a more dynamic scenario, this process becomes even more important.
Extrapolation, in this case, refers to the process of either:
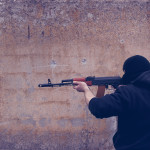
- Stopping the full, initial presentation process due to a close and imminent threat. We often post (e.g. stiff arm and retract) the target with the off hand, stop the presentation process at the step named ROCK (see HEAT articles Part 1 & Part 2) and fire the handgun at this juncture, or
- Withdrawing the handgun into the centerline from full presentation, as a close threat reaches or swipes at the handgun, often firing from this withdrawn position.
The skill set desired here is to hit the same target consistently (center mass) from the three positions of presentation. In order, these positions are found at the stages named: (1) ROCK, (2) PRESS (FIRE), and (3) WITHDRAW (FIRE). With some practice, you’ll do just that.
Check out the video for a visual presentation of the concepts, and look further down the page, I’ve included a few helpful hints for streamlining this process.
THE FUNDEMENTALS
Stance:
The second foundational skill is to master the stance. The HEAT stance provides optimal target-oriented assertiveness, balance, strength, and pivoting/turning when needed.
- STEP: take a natural step forward with your weak side foot
- SHARE: your weight should be slightly forward (60/40)
- SQUARE: your shoulders and waist should be square to the target
- BEND: your knees should be slightly bent, as you bend forward slightly from the waist.
Presentation:
The third foundational skill set is to master the handgun presentation process, including GRIP, RIP, ROCK, PRESS, PRESS, PRESS:
- GRIP: the dominant hand grips the holstered handgun with the web of the hand snuggly into the beaver tail of the handgun; the trigger finger is indexed; the middle, ring, and pinky fingers are wrapped firmly around the handle (middle finger set tight under the trigger guard; the thumb rides the safety with 1911 models or is set into the thumb groove on the handle. The hand, wrist, forearm and elbow are all in line with the front of the shoulder (i.e. a front on view shows no arm “leaking” outside the line of the shoulder).
- RIP: With the proper grip initiated, the defender rips the handgun straight up and out of the holster (with all holster retention defeated) until the shoulder no longer has any range of motion to support the elbow lifting upwards. The muzzle is still pointed at the ground and should not “laser” the defenders dominant leg or foot.
- ROCK: defenders rock their arm forward with an emphasis on the arm moving as a single unit, the elbow should end snug to the ribs, forearm straight, wrist straight, and muzzle pointed straight down range.
- PRESS: defenders begin the process of pressing the gun arm straight out with the intention of pressing to a fully straight arm, as high as the shoulders, and on target.
- PRESS: defenders press the off hand onto the handgun (see GRIP MECHANICS) during the process of pressing the gun out to the target.
- PRESS: defenders begin the process of taking the slack out of the trigger as the initial press process begins; once at the “wall” pressure remains constant.
- FIRE: as the defender locks out the arms from the continuing and initial press process, the trigger wall is breached and the handgun is fired (note: the handgun should be on target as the press process comes to lock-out or near lock-out).
Specifics Related to Presentation
Grip Mechanics
The grip is the most important element in accurate shooting – period. An accurate grip has several key elements:
- The hands surround the handle – 360 degrees – providing pressure around the entire pistol grip.
- The web of the dominant hand is placed high into the tang/beaver tail.
- Both thumbs are placed high and forward across the frame.
- The non-dominant hand index finger and others are placed against and under the trigger guard.
- All contact with the handgun is firm.
- The trigger finger utilizes the last digit to manipulate the trigger.
Target Acquisition
As the defender presents the weapon, the focus of the eyes should be on the center mass of the target (i.e. for our purposes, draw a mental triangle – three inches below the collar makes the top tip of the triangle; draw equal length lines 12 inches out and down the body and 10 inches apart at the bottom; connect the dots). As the presentation process occurs, the handgun will “interrupt” the focus on center mass. Continue the focus on center mass, but notice the front sight settling into the center mass triangle, as the lock out, press the trigger to fire the handgun.
Trigger Control
Once the pad of the finger is place on the trigger, all the slack (if there is such) should be taken out of the trigger until the “wall” is reached. As the arms lock out and the view of the target is interrupted by the front sight, the finger presses through the wall until the trigger “breaks” and the sear is released, firing the chambered round. As the finger releases the fully depressed trigger, the action is reset and another round is chamber. Approximately half way back to full trigger release, the trigger resets (you can feel this once you know what to expect). At this point, the trigger has returned to the “wall.” At this point, the shooter can break through the wall again and fire another round or follow the target down or out of sight if a retreat is underway.